The Lobster remote only controls the feed and the sweep functions. We'll add control of power for the everything after the power switch—that lets you turn off everything and start collecting balls without draining the battery from the motors running. The feeder control lets me stop the feed motor without having to wait twenty seconds for it to start feeding balls when I’m ready. You could wire a remote to other tennis ball machines. After removing the control panel, you may find labels on the wires (such as “Feed motor”, “upper servo”, “lower servo”, “sweep” etc) . Without such labels, you may follow wires from the motors or start pulling wires to see which motors they control.
You need:
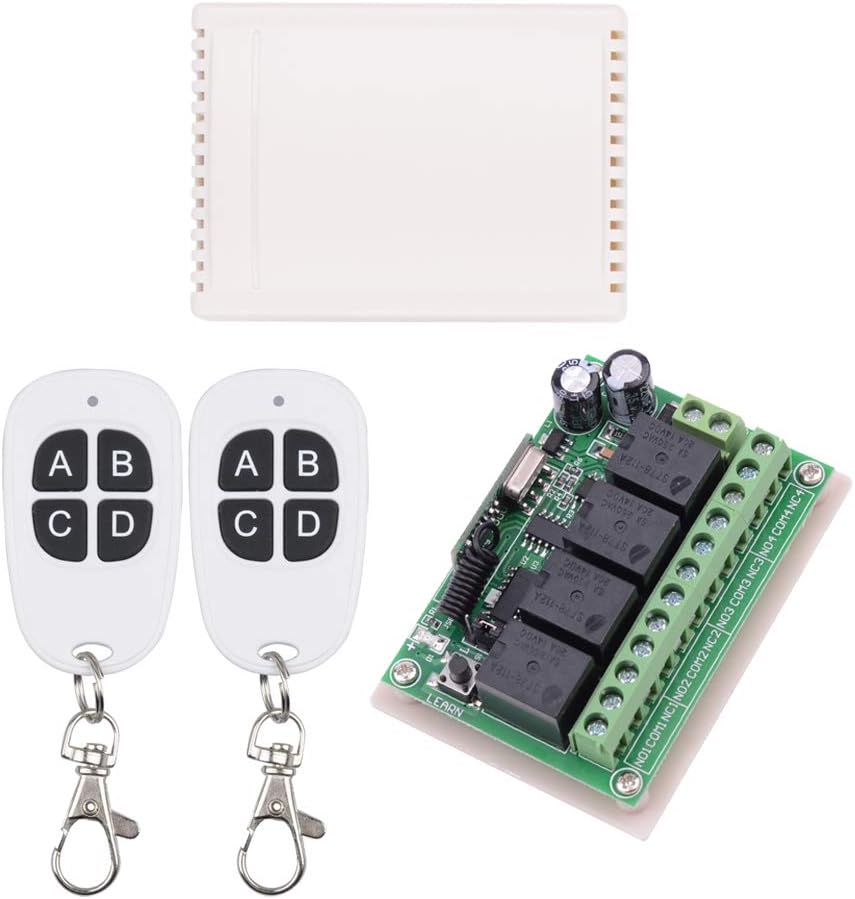
- a four channel RF receiver and transmitter kit from Amazon. It comes with four transmitters ($23).
- 14 (or 16) gauge stranded wire: one piece of red and two pieces of gray, each 24" long. Two feet of black. Two 24” pieces of single strand green wire. Two 24” pieces of single strand white wire. As of November 2023, one store had no single wire red, black or gray—they only had gray casing with 16 gauge red and black wires inside—buy two 24” pieces and pull the black wire from one and the red wire from the other, leaving you with a red wire, a black wire, one red wire with a gray casing and one black wire with a gray casing.
- wire nuts (I used two)
- one spade terminal, below (for the black wire)

- a stripping tool (or a small knife)
 stripping tool. It also crimps and cuts.
 - double stick tape (optional)
- screwdrivers for the receiver terminals and for a bolt on the machine to attach wire from the receiver's negative power terminal.


Program the receiver
Do this first. In Figure 2, look for the letters L, S, and T near the coiled black wire on the receiver--each letter has a small pin next to it. A small plastic jumper may bridge those pins. Mine arrived with one leg of the jumper on S, and the other leg off to the side, joining no pins. Use tweezers or a like tool to pull up and replace the jumper in the position as shown above. You’ll join the pins next to S and T.
1. Bring power to the receiver. It needs 12 volts DC. The remote switch receives 4 volts, so wiring the receiver there probably won't work.
The receiver does not receive power when the power switch is in the off position. Three wires, two gray and one red go from the power switch to the circuit board. On my Lobster, pulling off the middle wire cuts power to the ejecting motors. Before you cut the middle wire, pull it from the circuit board and flip the power to "on"--if the motors don't start running, you can cut this wire--no need to check the other wires the same way. I cut the middle wire. Next, use a wire nut to splice a red wire (we'll call that A) and a gray wire (we’ll call that wire B) to the free end of the cut gray wire running from the on/off switch; connect wire A to the positive terminal of the receiver (marked V+). Wire one end of the black wire to the receiver's negative power terminal (marked V- ); crimp a spade terminal to the other end and loosen a bolt on the machine chassis—secure the spade terminal under it (the machine chassis is wired to the negative pole of the battery)—tighten the bolt.
After each use, flip the ball machine’s power to "off" to reduce the power the receiver draws from the battery.
2. Connect the receiver to on/off function.
Connect the gray wire B to the terminal marked COM4. Connect with a wire nut, a new gray wire (C in Figure 3) to the cut end of the gray wire attached to the circuit board. Now connect the other end of wire C to the receiver's terminal marked NC4. We’ve just interrupted the gray wire, interposing the receiver, and allowed remote control of power to the circuit board.

Now check your work by flipping the power switch on the control panel to "ON" When you flip the power switch to "ON", an LED on the RF receiver should light up and the ejecting motors will activate. Most likely, the remotes are already programmed to the receiver, so if you press A on the remote transmitter, it'll turn off the motors. Press A again and motors turn on again. (Yup, A on the remote controls the wires to NC4/NO4/COM4, B controls wires at NC3/NO3/COM3, etc)
That was the hard part. The rest is easy.
3. Connect the receiver to Feed function.
Find the two wires that go from the circuit board to the feed motor. Mine had a label marked FEED. Cut one red wire just outside the machine housing and connect the ends to one green wire each. Connect one green wire to NC3 and and the other to COM3 on the receiver. Button B on the remote transmitter will control this function. Pressing B while the machine is feeding balls will turn the feed motor off. Another press turns it back on. Test this function before moving on to the next step.
4. Connect the receiver to Sweep function. Look for a pair of wires labelled "SWEEP". Cut a wire (I cut the red one again) just outside the machine housing and connect each cut end to a white wire. Connect the ends of the white wires to COM2 and to NO2 on the receiver. Flip the control panel "HORIZONTAL" switch to ON. Button C on the remote transmitter will control this function and will turn the sweep motor on. Another press will turn it back off. IF THE REMOTE SYSTEM EVER MALFUNCTIONS, move the wire from the "NO2" terminal to the "NC2" terminal, allowing the machine to function as from the factory, until you troubleshoot the system.
If the transmitters weren't preprogrammed (mine were) you can program them following the barely English instructions that came with the RF kit. Turn on the machine and test the remote functions.
Mount the remote
You can use double stick tape (may be included in the kit) to position the receiver on a clean, smooth flat surface inside the ball machine. Because the space is somewhat limited, I just pushed the receiver into the machine on the right side away from the ball throwing wheels. Over time the double stick tape will fail and the receiver will find its place. Gently stretch the coiled black antenna on the remote receiver. Push all the wires into the machine.
Replace the control panel.
Once you've turned on the ball machine, the ejector motors turn on and after a short delay (20-25 seconds for many machines) the feed motor turns on. This is the button assignment:
A: power to all motors.
B: power to the feed motor
C: power to the sweep motor.
D: none
Troubleshooting:
Nothing works. Check the wire connections to ensure that no wires have fallen out of the wire nuts. Make sure the power switch is in the ON position. Also flip the power off then back on after ten seconds. Does the RF receiver have power? An LED on the receiver indicates power. Are all the wires securely connected to the proper terminals and the other wires? Ensure that you've flipped the power and HORIZONTAL (sweep motor) switches on the control panel to ON. Do the transmitters need fresh batteries? A red LED on the transmitter lights when you press a button.
The balls don't feed. Ensure that the FEED knob on the front isn't at or near OFF. Lobster left out a small detail here.
The ejecting motors run but the balls still don't feed. Turn off the machine from the control panel. This resets the RF receiver. Wait 7 seconds and turn it on again.
Post script
The Lobster Elite control panel has a jack that accepts a plug from the $169 remote module Lobster sells. Initially, I thought I should wire the RF receiver into the jack, but wiring it would have required guesswork, since I'm not electronically adept with circuit boards.
If your Lobster had a remote receiver and you lost/broke the remote, you might find a programming button on the receiver and use a transmitter from one of these kits.
The most critical detail after you’ve finished this installation: going out and having fun hitting balls!
I want to use a 2 ch for feed and sweep, Should I connect main positive to V+ , ground V-, and then follow sweep and feed steps. I'll just let it run (on/off) from main circuit board switch.
ReplyDeleteSorry for the late reply. You know what you're doing, by what you've written.
DeleteThank You for this tutorial!! I followed it yesterday and your instructions were awesome. I hit one small issue which I'm wondering if you happen to have any helpful ideas. I've tried a few different antenna orientations but I can't seem to get the range over 60 ft. Do you have any tips for increasing the range by antenna orientation or other means? (I got the same RF components from Amazon that are in your image) Thanks! Scott
ReplyDeleteThanks for this tutorial. I will definitely give this a try.
ReplyDeleteAnother question: Are you aware of a way to speed up the feeder wheels on the Lobster elite liberty (beyond the max on the dial)? I know the models above this model will toss about 10 mph faster.